How to Read a Spirit Level

Levels are essential for anyone who is working with building materials. They help you determine if something is plumb (meaning if a vertical object is straight up and down, perpendicular to the horizon) or level (the object is perfectly flat, parallel to the horizon) in just a few quick moments. While there are several types of levels, spirit levels are able to be used in a wide range of construction jobs, such as masonry, carpentry, metalworker, landscaping, tile, drywall and more.
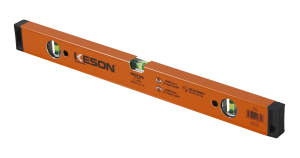
So what is a spirit level? It’s simply a perfectly flat surface that has bubble vial(s) fixed in a static position in relation to that surface. Typically, this structure is an aluminum, rectangular box (called a housing or a profile) with a spirit vial locked in place.
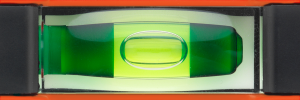
This is so that when the flat surface is parallel to the horizon, the bubble of the vial indicates that position as “level” by lying perfectly between two perpendicular indication lines. Often a level will have additional vials fixed perpendicular to this measuring surface as well. This enables the level to be used to measure vertical “level-ness” (i.e. perpendicular to the horizon) or plumb.
The term “spirit” in the name refers specifically to the liquid in the vials. Early levels used to contain actual spirits (aka alcohol since it didn’t freeze), but today, most manufacturers use their own proprietary formulas.
Reading a spirit level is easy; in fact, spirit levels use a much simpler process to find plumb or level than many other tools, including plumb bobs or lasers. Learning to use one properly can ensure a fast, easy and accurate job every time.
Get to Know Your Level
Spirit levels, or bubble levels, come in a wide range of lengths, housings and profiles and even some different shapes. Your level will have at least one, or more likely three, spirit vials inside the housing. Some even have four, and some only have two due to length.
The vial, or vials, that run parallel to the measuring edge of the tool are used for checking the level of a horizontal area or object. The vial or vials that run perpendicularly to the measuring edge side of the tool are for checking the plumb or the vertical level of an area or object.
In addition to these vials, as the quality of your level increases, it may have handholds or grips to make it easier to hold when checking plumb. Your level may have a long, flat, milled edge for resting it on a surface when taking a level reading. And it may also have magnified vials to make it easier to read, and cushions or end caps to help protect it from damage when dropped.
Reading the Level

Reading your level is fairly simple. To check if an area or object is level, first make sure that both the level and the area to be measured are both clean and free of any debris that could throw off the reading. Sliding a protected hand or finger over the surface to clear it can save you time due to interference.
Place your level on the surface, milled edge down, so that the vials are easily seen when you view the level straight on, then inspect the horizontal vial. The bubble in the center of every vial (if there is more than one) should be centered between the two level indication line marks.
If the bubble is centered, the surface you are checking is level. If the bubble is off center, then your surface will be rising up to the side that the bubble is higher on. For example, if a bubble is off to the right, then your surface rises to the right. Conversely, that same surface could be described as sloping down to the left. It’s a matter of perspective.
Adjust your area or the object as necessary and repeat until you get a level reading you desire. This can be as easy as pressing the level down on a span of bricks so that the bricks settle more completely into the mortar, tapping a door jamb a time or two with a hammer to drive it more perfectly into position, or it may take adding some material like gravel or sand to bring that surface into level.
If you are concerned that your level is not accurate, perform an accuracy test to be sure. Accuracy tests are especially important if you’ve recently dropped or hit your level. We know of one worker who checks it each day and whenever it’s returned by a borrower.
Checking Plumb

Getting a plumb reading on your level is much the same as checking a horizontal surface. The difference is that you will need to hold your level up against the surface you’re checking, unless your level comes with a magnet or other way to adhere it.
Use the grips on the level to ensure that it’s steady, and press it firmly against the vertical surface, measuring edge against the surface.
Check the easiest to read vial that is now running parallel to the ground. Once again, you are checking to see if the bubble is centered. If it is, the vertical surface is plumb, but if the bubble is off to one side, the surface is out of alignment. Adjust your surface accordingly (i.e. bring it into level) and check it again. Repeat until it’s level.
Use Your Level Correctly
Levels are an important tool that can help you do your job correctly, but they need to be used properly to ensure that they give an accurate reading. For more information on reading levels, contact a Keson expert today.

